Achieving The Principle Of Least Privilege in AWS
Learn how AWS CloudTrail and IAM Access Analyzer can help you to generate IAM policies with minimum permissions
When learning about AWS, you will often be recommended to use the principle of least privilege. But, it's easier said than done; implementing it is hard because:
- It's easy to forget or get a permission wrong
Usually, when you create a new service, you would start with an empty set of permissions and add them as you need while coding. But, people might forget to add a permission, or might even use the wrong one! Having to constantly worry about it can slow down your work.
- It requires a deep understanding of the service, and the permissions it actually needs
One example is creating a role for your IaC, such as the CDK or the Serverless Framework. They usually generate "hidden" resources under the hood, like IAM roles and policies, CloudWatch log groups, etc. They also often require permissions to create/control extra resources related to the deployment itself (e.g. S3 Buckets, using the SDK, etc.). These permissions are not always obvious.
- it requires a good knowledge of the IAM Action names
How many times did you wonder "What was the name of the Action I needed to put a file into S3 again?". So you constantly have to jump over to this page and figure it out (or, if you are using Serverless Framework, AWS SAM, CloudFormation or Terraform, use the IAM Legend VSCode Extension by Sebastian Bille).
Sometimes the only solution you have is the trial-and-error technique, which can take ages to conclude:
- Run the service
- Check logs for errors
- Add the permission as shown in the error
- Go back to 1.
For all these reasons, developers might be tempted to set a wide set of permissions, which isn't a good idea.
It does not have to be like that! In this article, I will show you how to use AWS CloudTrail and the IAM Access Analyzer to hopefully make this process easier.
AWS CloudTrail is an AWS service that records actions taken by users, roles, or AWS services. It helps audit your AWS account.
The IAM Access Analyzer analyzes CloudTrail logs, and identifies actions taken by IAM entities to generate IAM Policies from them.
How does it work?
By leveraging those two services, we are able to analyze the exact resources and actions that a specific role accesses in a given period of time. We can then infer the minimum set of permissions that it needs.
How to use it?
Enable CloudTrail
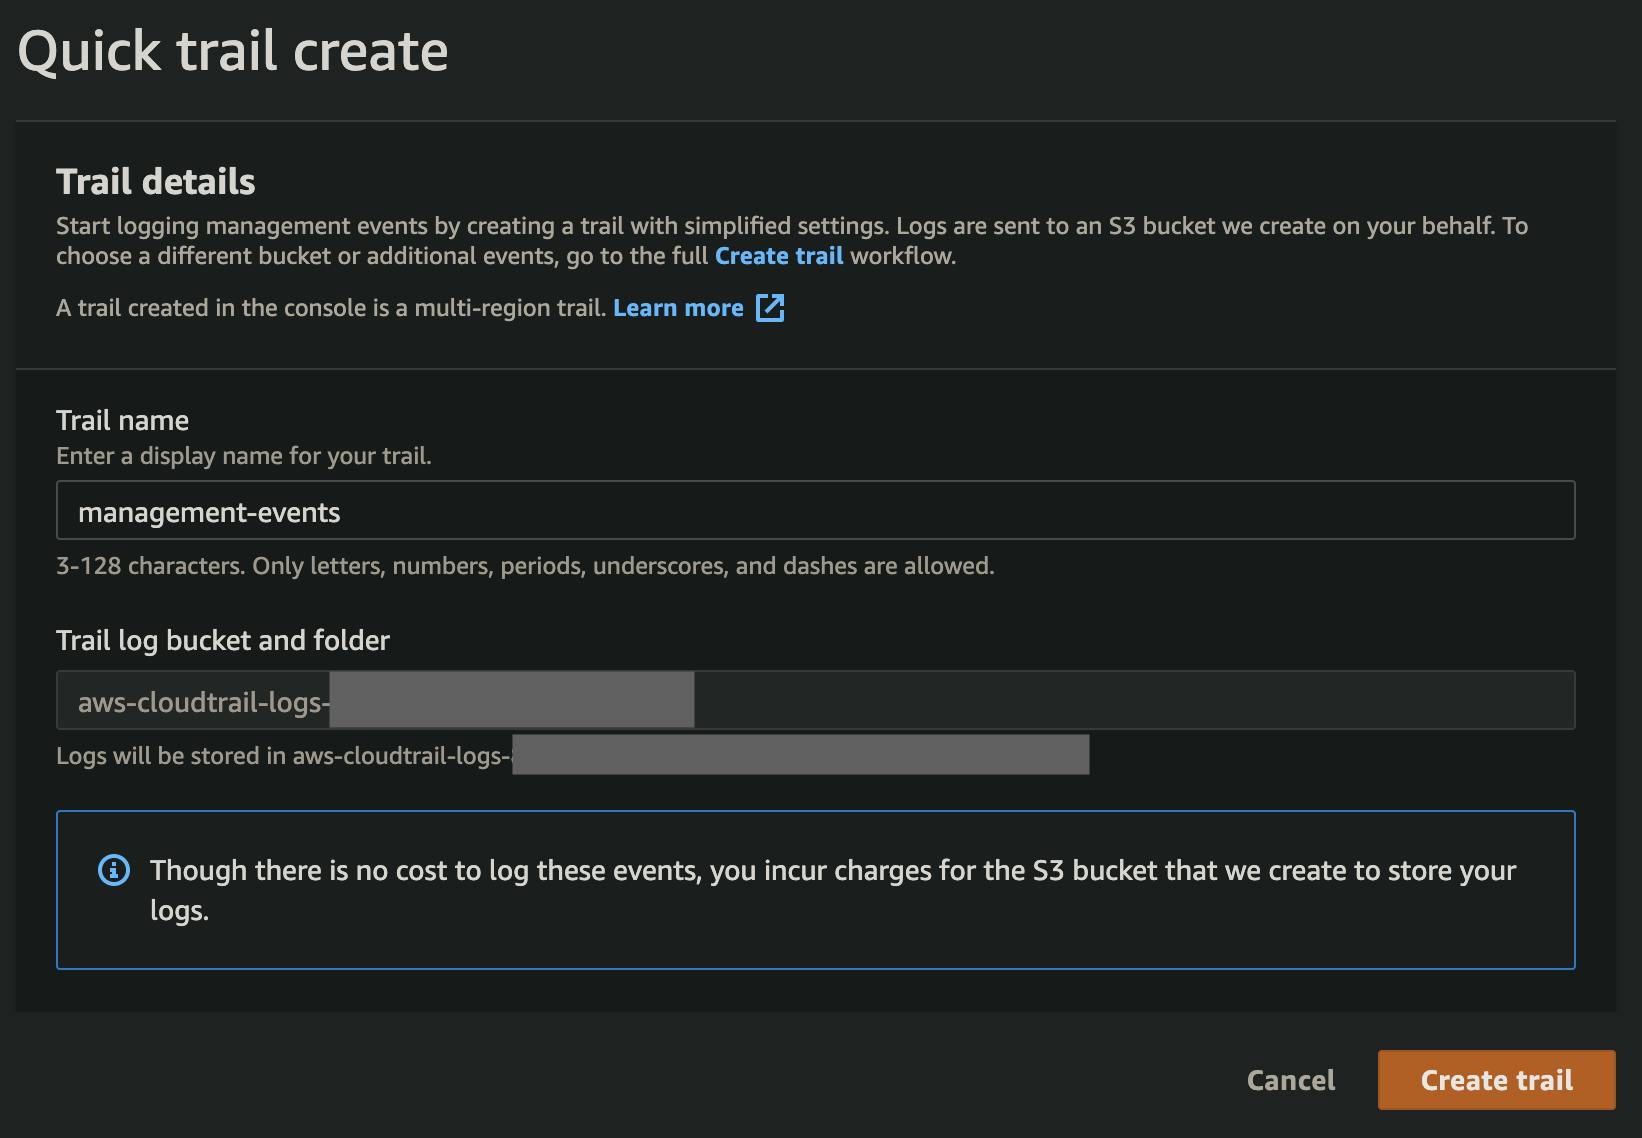
If it's not already done, the first thing you'll need to do is to enable CloudTrail. Go to the CloudTrail Dashboard and create a trail.
Create a role
Your service will need a role to run. If it does not already have one, create one. When generating the policies, set a wider permission set that will ensure the service runs properly (i.e. without hitting permission errors). For example, you could use an Administrator policy that grants access to everything, but you could also grant a more minimalistic set of permissions if you already know the services it uses.
You policy might look like this:
        - Effect: Allow
          Action:
            - lambda:*
            - s3:*
            - ssm:*
          Resource:
            - '*'
Let the service run
Now that your service has more permissions than it needs, you should not come across any permission issues. You can run it. CloudTrail will log every action taken by this role. You could probably let it run for a little while to make sure that all use-cases are met.
Generate fine-grained IAM Policies
After your service has run for some time, and you are confident enough that all use-cases have been met, you can go ahead and generate a new fine-grained policy using the IAM Access Analyzer.
Go to the IAM roles console and select the role that you want to refine.
At the bottom of the page, you can find the policy generator.

Click Generate Policy
You now need to select the time period that you want to use for the CloudTrail analysis, the region your service is running in, and the trail that you previously created.
Click Generate Policy
This will take a few seconds to process, depending on the time period and the amount of data in CloudTrail to analyze. Wait until the status becomes Success
Review the Policy
When IAM Access Analyzer finishes, it will show you information to help you with the generation of the policy. Two categories of information can be found:
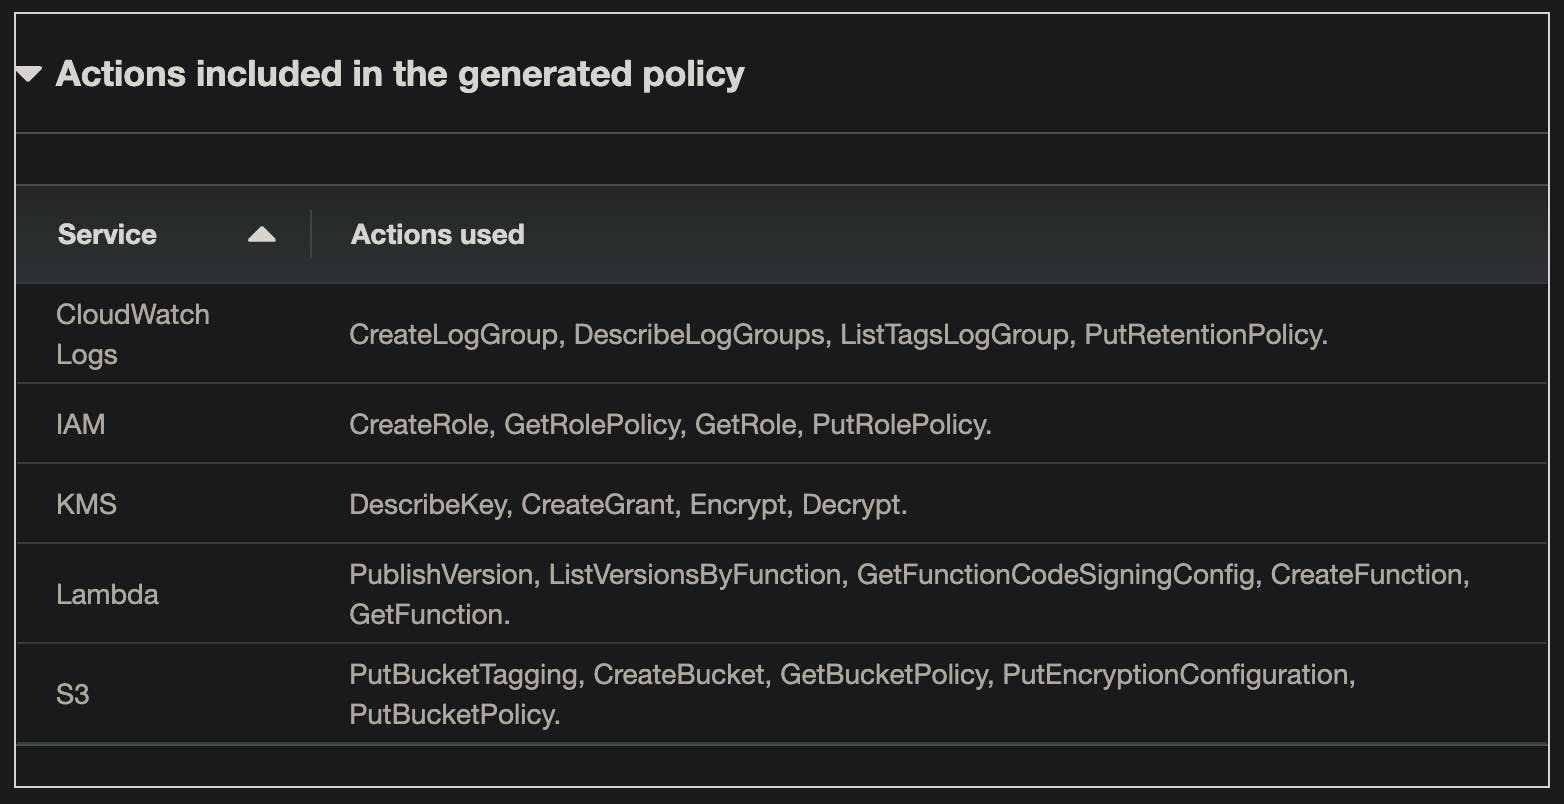
- Detailed Actions
For some services, IAM Access Analyzer is capable of detecting the exact actions that were used. You will find them in this section. They will be automatically added to the generated policy.
See the list of supported services
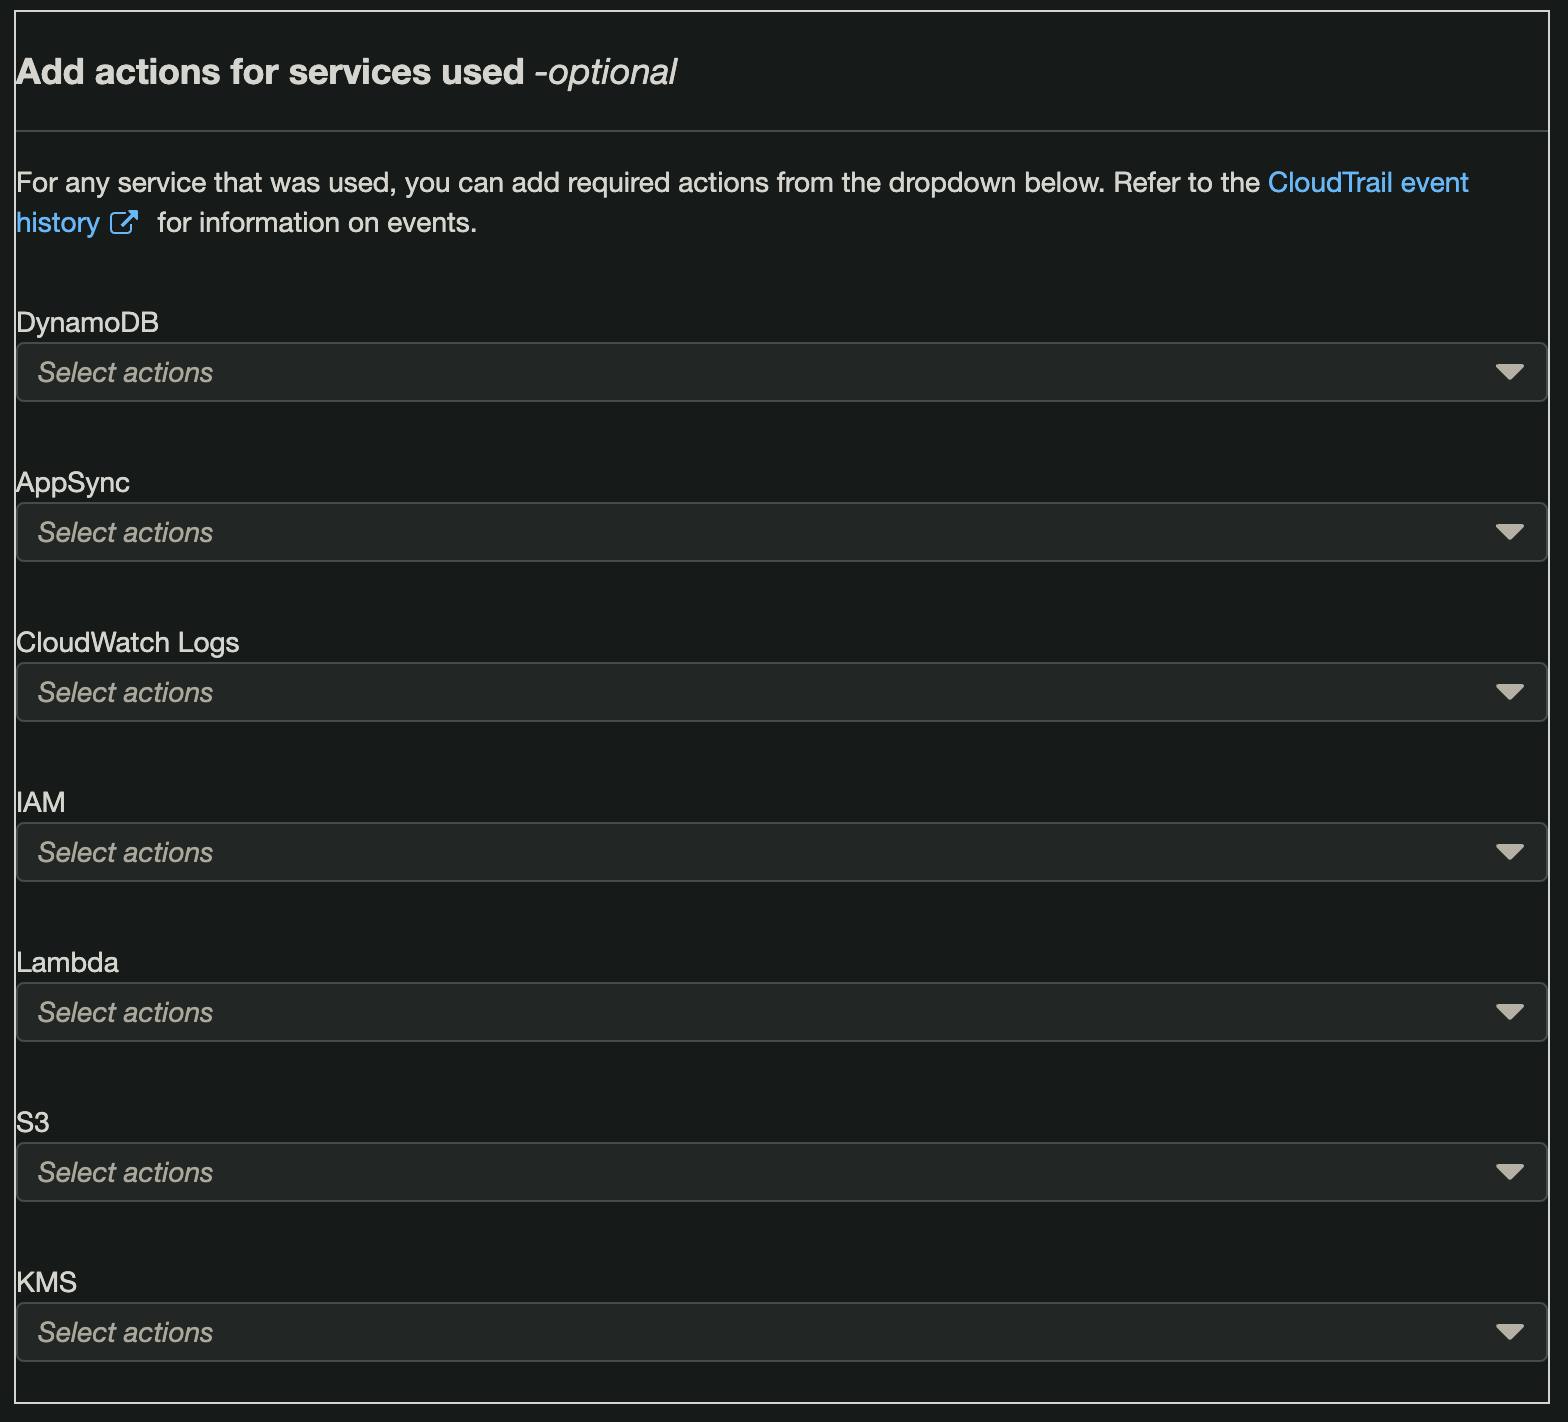
- Used services
For other services, however, IAM Access Analyzer is not able to know the exact actions that were used. It is only capable of letting you know what services were used. You will have to inspect them, and manually select the actions that your role needs.
💡 You can also inspect the CloudTrail event history yourself to see more details. Check
the Event Source, Event name, and Username columns. They will give you clues about how the role used those different services.
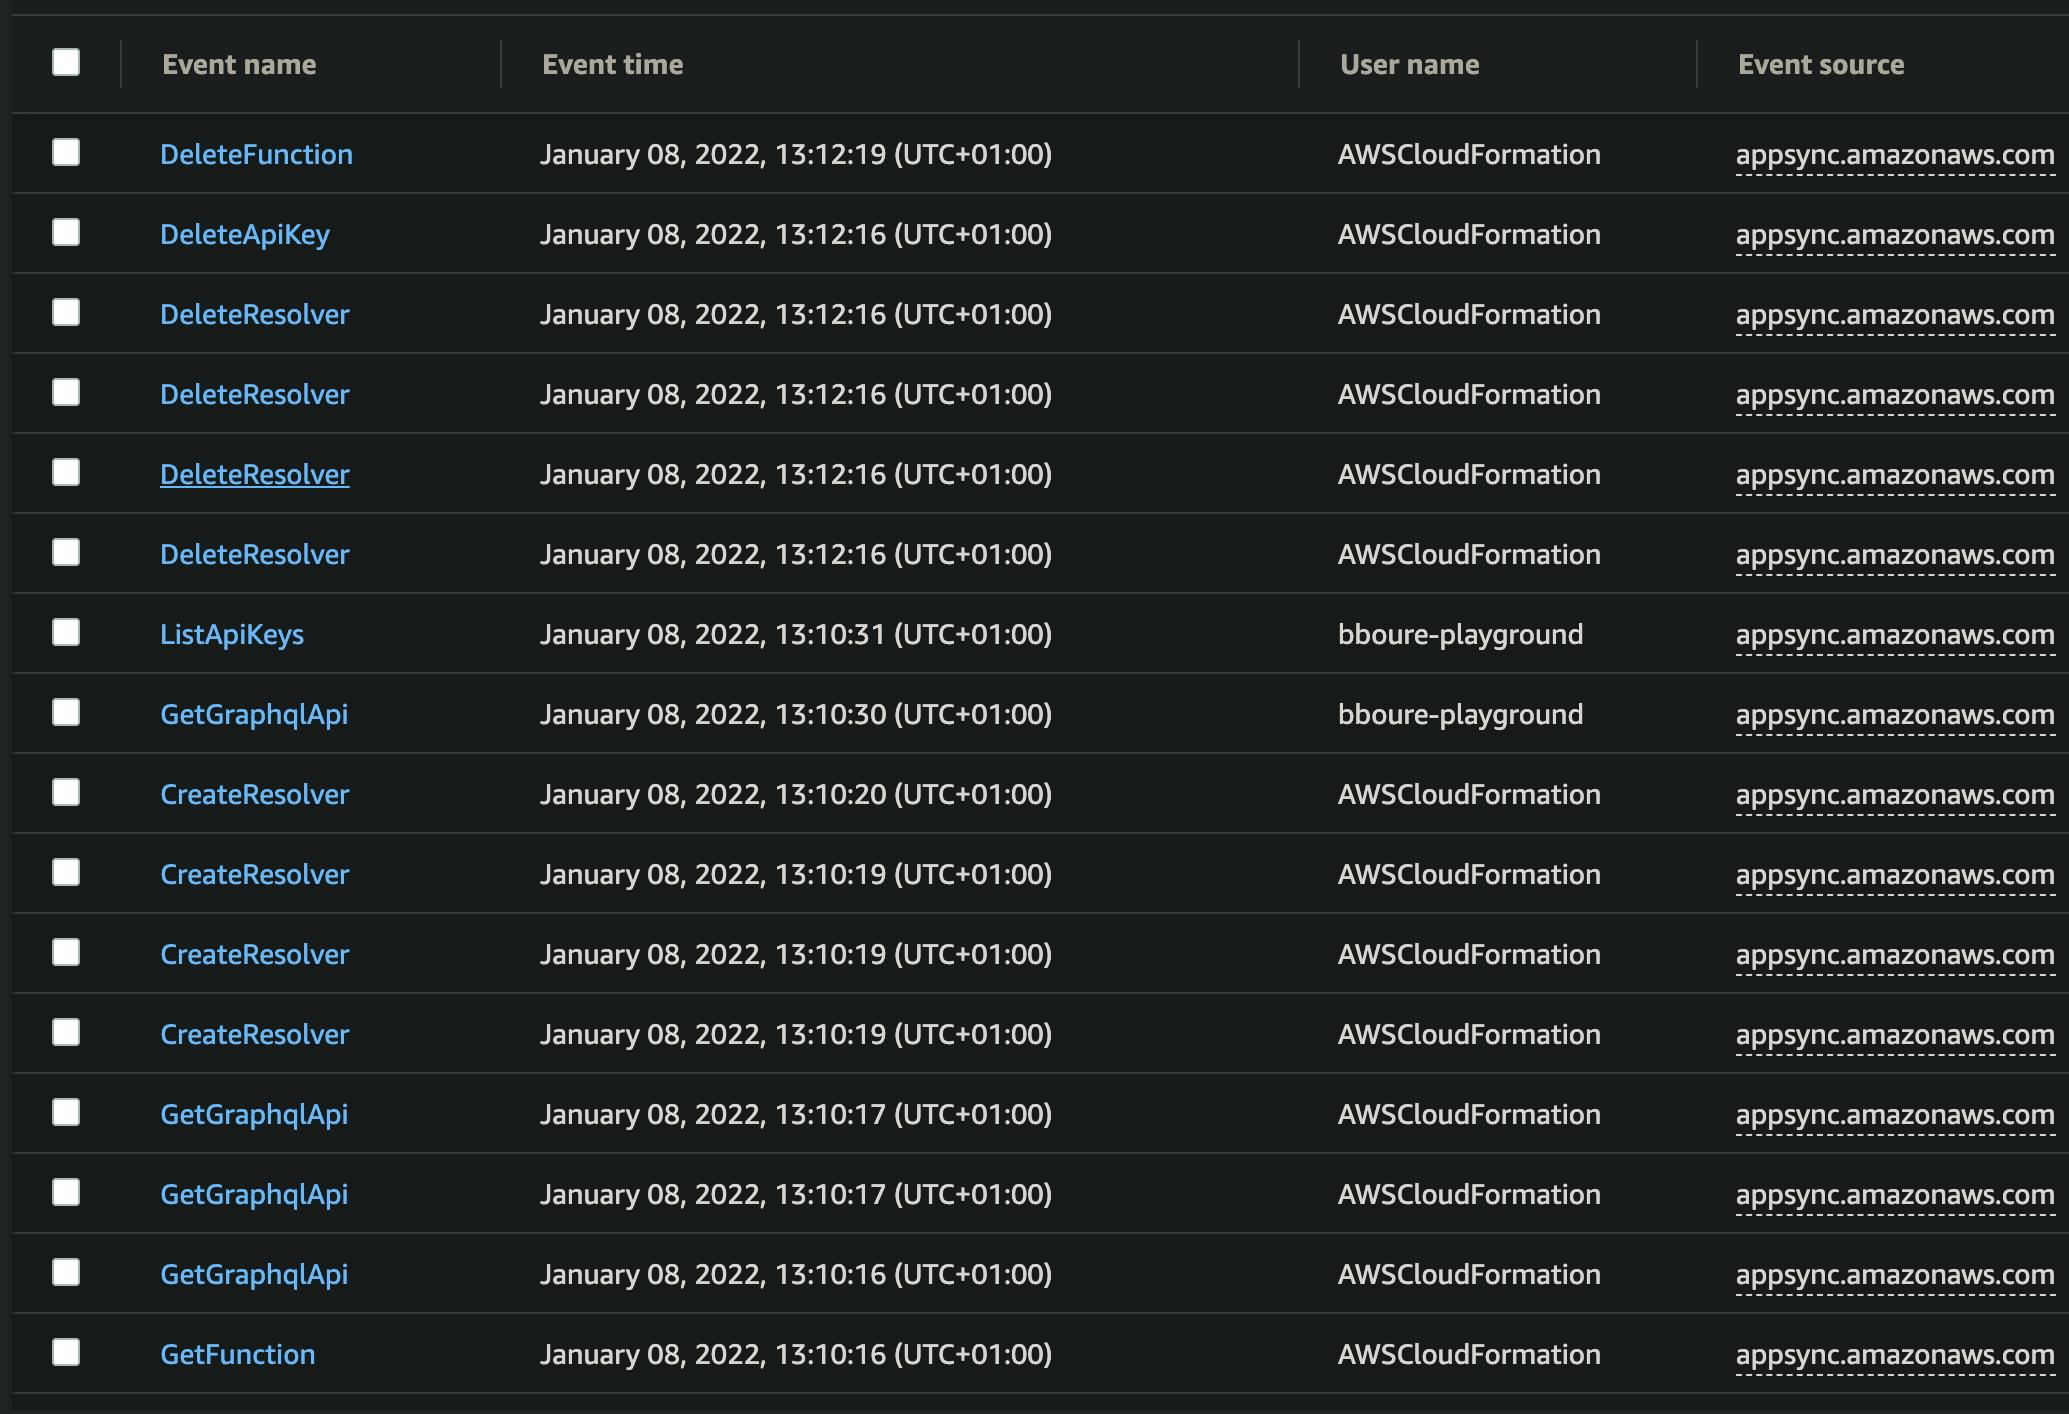
When you are done, you can click Next.
Customize permissions
Once you select which services and permissions to include, you will be presented with the generated IAM Policy in the JSON format. This gives you an extra opportunity to do a few things:
- Double-check the services and permissions
It is not a bad idea to review the generated JSON to make sure it is accurate. Remove any superfluous permissions or add any that are missing.
- Replace the
ResourceARN placeholders
Unfortunately, IAM Access Analyzer will not specify the full ARNs of the target services. It will show placeholders instead. You should replace those placeholders with the ARNs of the real target resources. Try to be as specific as possible (e.g. Don't use *).
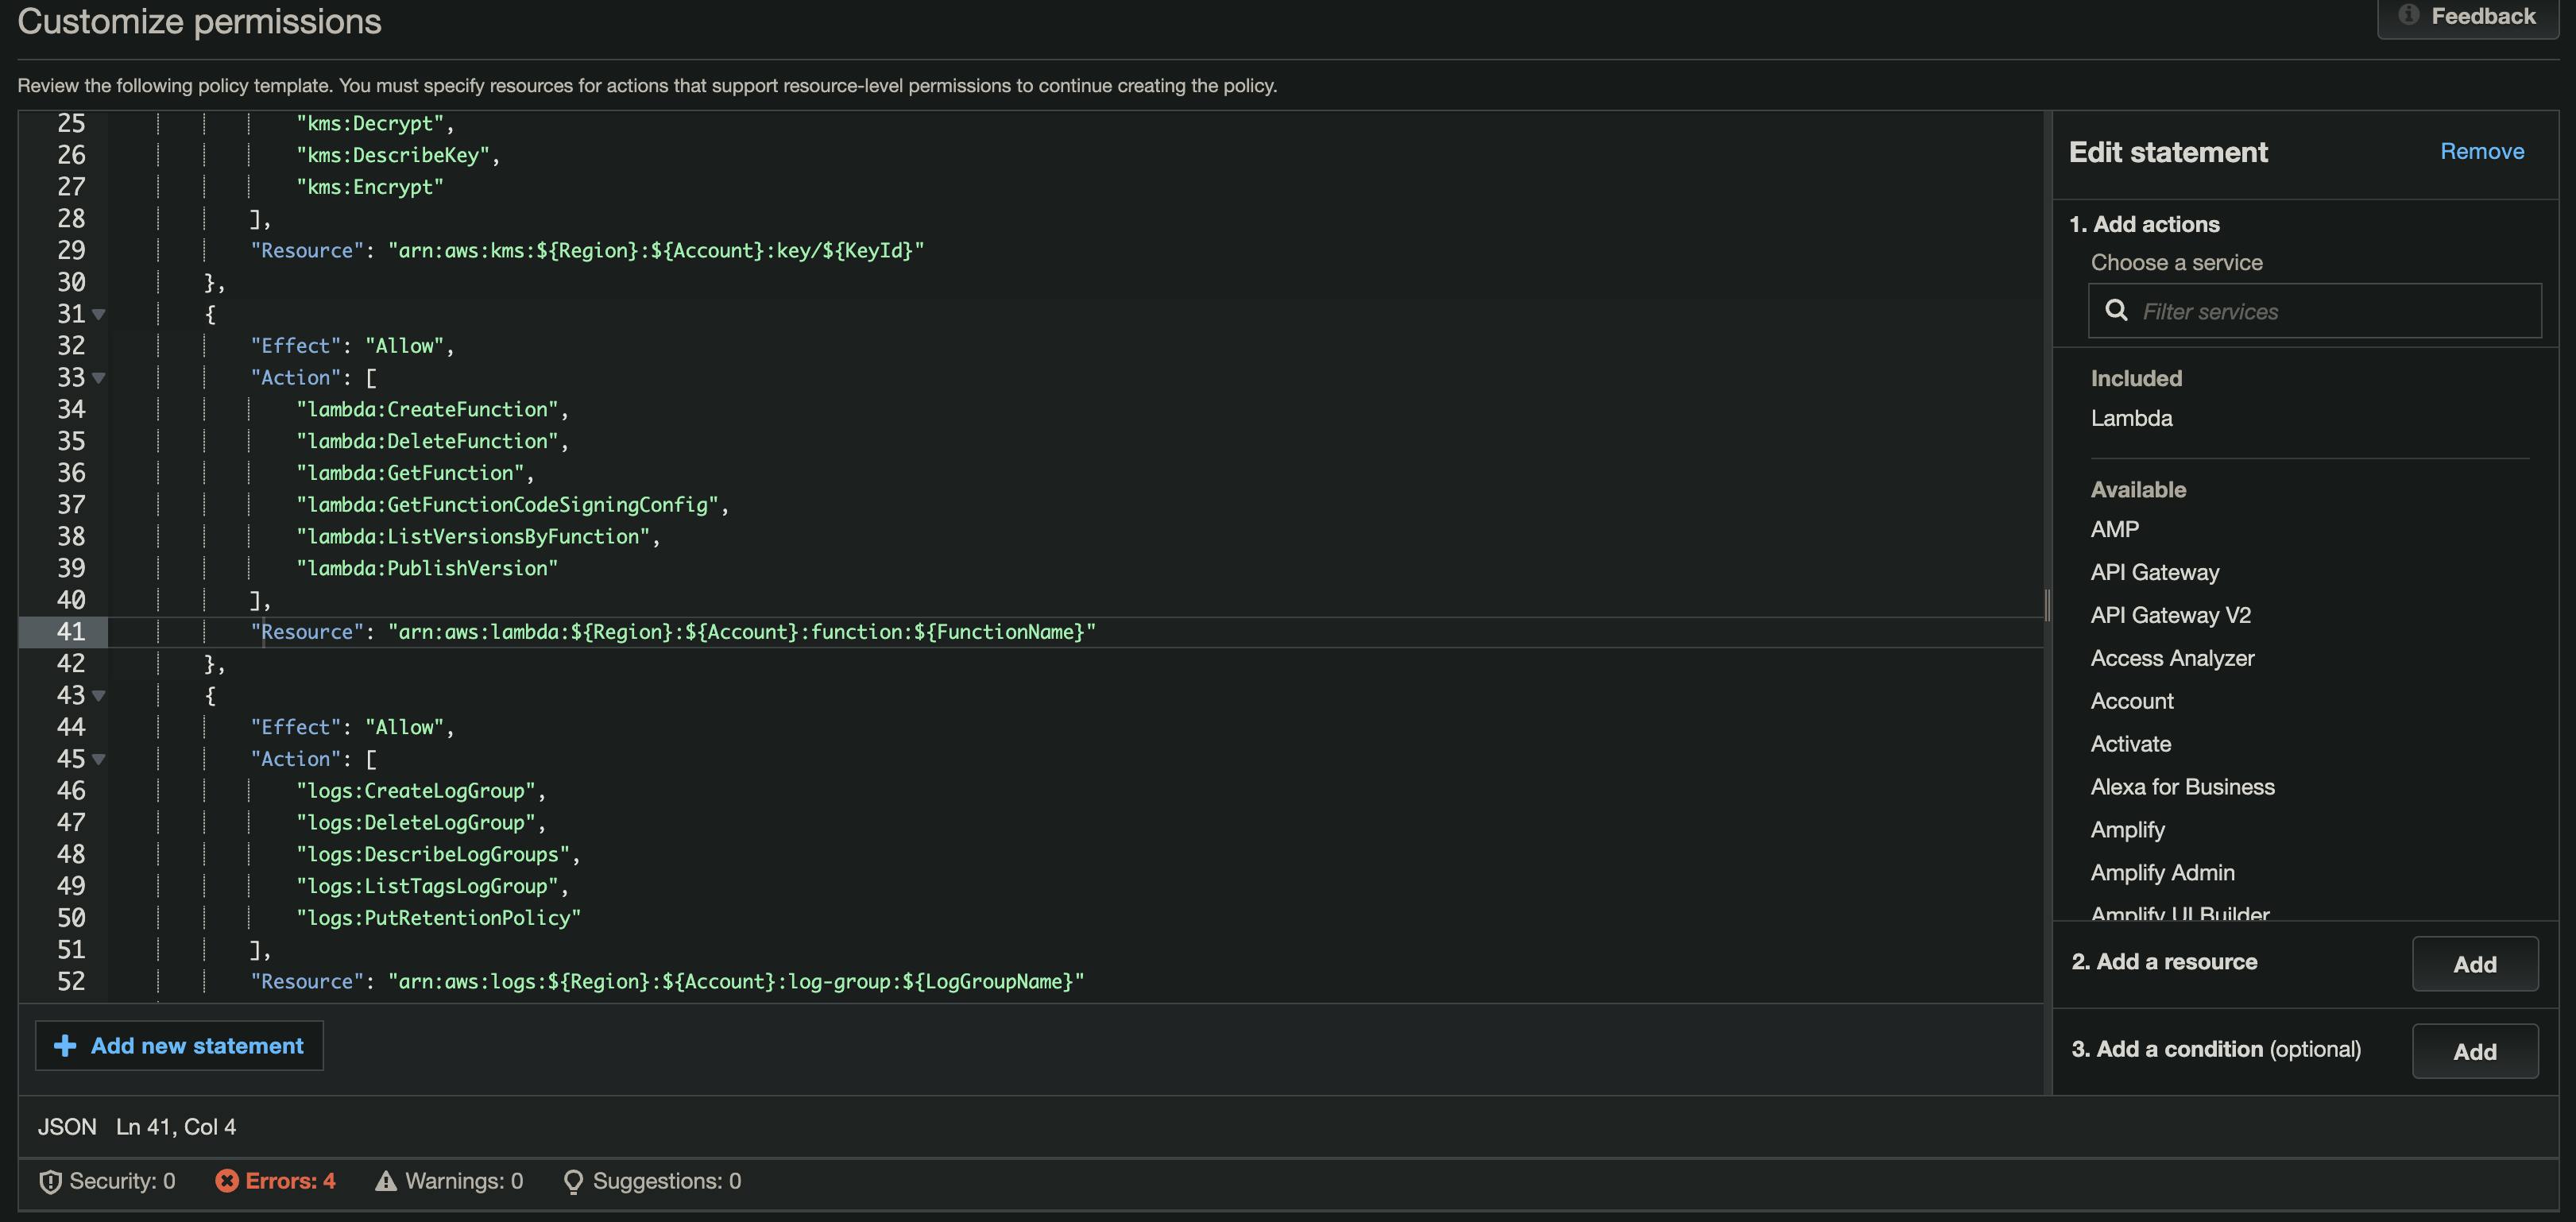
When you are done, click Next. You will see a final summary of the generated policy. You can give it a name and description. You can also choose to attach the policy to the existing role.
⚠️ Don't forget to detach the former Policy with too permissive permissions from the role.
💡 You can also copy the policy as JSON, and export it to your favorite IaC framework. This can facilitate the process of defining the ARNs because you can replace them with CloudFormation references and intrinsic function calls.
It's free!
The best part of the IAM Access Analyzer Policy Generator is that it's completely free of charge! CloudTrail also has a very generous Free Tier *
* Check the conditions, extra charges may apply depending on your usage. Charges may also apply for S3 storage.
Tips
When using this technique, keep the following in mind:
💡 Use a dedicated role that will only be attached to the service you are trying to scope
Create a role specifically for the service that you want to analyze. Don't use a generic "admin" role that can be used by something or someone else. Otherwise, you might end up with a wider set of permissions than your service really needs (which would make this whole process completely counterproductive). It is considered good practice to have one role per service anyway.
💡 If you are trying to define the permissions for an IaC deployment procedure, use a separate Deployer role and a CloudFormation execution role
If you are using IaC, such as the Serverless Framework, you will need a different set of permissions for the Deployer (the role that triggers the deployment) and the CloudFormation execution (the assumed role that creates/modifies the resources). It is considered good practice to separate them. You can then reduce each role down to exactly what it needs separately.
💡 Make sure to run your service for long enough, or you might miss some permissions
As mentioned earlier, make sure you run your service with an initial permissive role for long enough to make sure that CloudTrail catches all the permissions your service needs. But, also make sure to run it for long enough using the newly generated policies to make sure it is not missing any permission before you go to production.
💡 Don't use this in production accounts/environments
It might seem obvious, but you should not use this method on production environments/accounts. It is fine if a dev account has wide permissions during the development or proof of concept phase (as long as it is isolated in a dedicated account). It can even make it easier and faster. When you're done, it's the best time to apply this method, before going to production.
💡 In some cases, it might not be worth the effort
If you have a fairly simple service that executes a limited set of actions (e.g. a single-purpose Lambda), it might be easier/faster to set the permissions manually from the beginning and avoid this rather long process.
Conclusion
In this article, I showed you how to generate fine-grained IAM Policies that follow the principle of least privilege with the help of CloudTrail and IAM Access Analyzer.
It is not a silver bullet solution - it requires some time to put into place and you still need to manually do a lot of work. However, instead of doing it from memory, going through the entire code base, or using the trial-and-error technique, this alternative can help you to quickly identify most of the services and permissions that your policies need. It can also facilitate and make the development process more agile by helping you not worry (too much) about permissions from the very beginning.
If you are interested in content like this, consider following me on Twitter @Benoit_Boure

