


In this post, I will recount my experience of trying out Lambda layers with a small project. It proved to be a good way to get an understanding of what Lambda layers are, how they are used, what their limitations might be, and when they could be useful.
Clone the companion repo to run the code for yourself.
TL;DR
esbuildwill bundle layer code if you are not careful- Use
pathsintsconfigto compile locally - Lambda layers are immutable and functions reference a specific version
- SSM parameters can be used to deploy updates with no rebuild
- Conclusion,
npmbetter for most use cases of reuse
The starting point
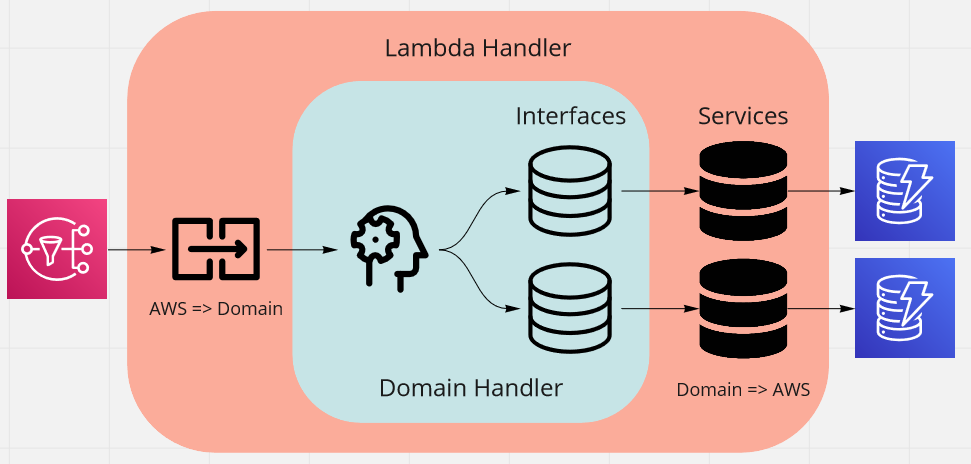
In an earlier post, I created a Lambda function that used a hexagonal architecture approach. The following diagram shows how we abstracted the implementation of the data stores from the domain logic.
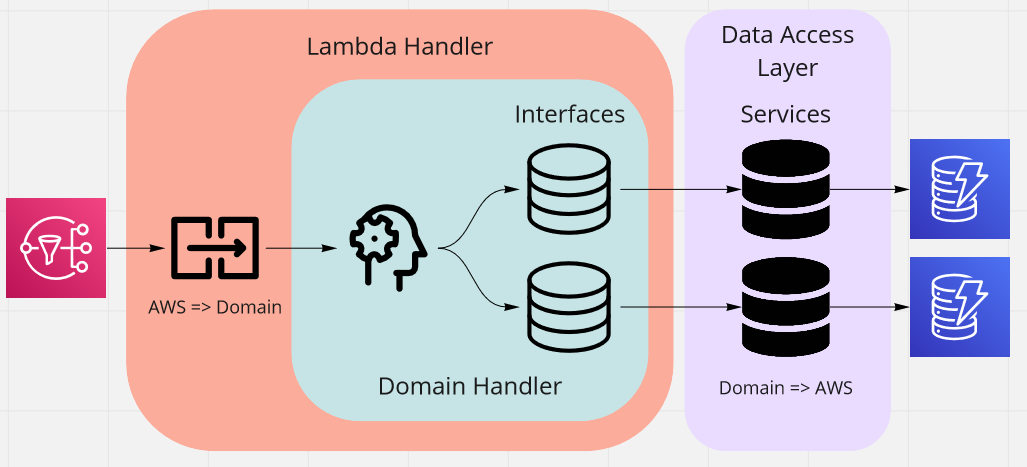
This separation made me wonder whether it might be an interesting thing to try to package these data stores as a Lambda layer. The intended result is shown below.
Packaging and deploying the layer
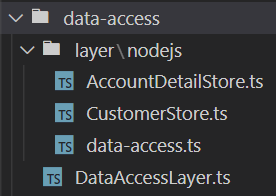
The folder structure I chose is shown below. The layer contents are in the layer\nodejs folder. The *Store.ts files contain the data store classes which are in turn exported by the data-access.ts file. There is a convention at play here, as for Node.js layers to work, the code must be in a nodejs folder.
The DataAccessLayer.ts file contains the CDK construct that will be used to package and deploy the layer.
The DataAccessLayer construct is shown in full below
export default class DataAccessLayer extends Construct {
  //
  static readonly LAYER_ARN_SSM_PARAMETER = '/layer-arn/data-access';

  readonly layer: ILayerVersion;

  constructor(scope: Construct, id: string) {
    super(scope, id);

    this.layer = new LayerVersion(this, 'DataAccessLayer', {
      compatibleRuntimes: [Runtime.NODEJS_12_X, Runtime.NODEJS_14_X],
      code: Code.fromAsset(
        path.join(__dirname, `/../../dist/src/data-access/layer`)
      ),
      description: 'Provides data access clients',
    });

    new StringParameter(this, 'DataAccessLayerArnSsmParameter', {
      parameterName: DataAccessLayer.LAYER_ARN_SSM_PARAMETER,
      stringValue: this.layer.layerVersionArn,
      description: 'The ARN of the latest Data Access layer',
      type: ParameterType.STRING,
      tier: ParameterTier.STANDARD,
    });
  }
}
The LayerVersion construct uses the Code.fromAsset method to point to the output from the TypeScript compiler (the dist subfolders). Note that it points to the parent of the nodejs folder.
Lambda layers have a version number, which is incremented each time it is deployed. As part of this construct we create an SSM Parameter to store the latest version. We will use this later on when deploying dependent components.
Now that we have our construct, we can create a stack to deploy it.
export default class DataAccessStack extends Stack {
  //
  constructor(scope: Construct, id: string, props?: DataAccessStackProps) {
    super(scope, id, props);

    const dataAccessLayer = new DataAccessLayer(this, 'DataAccessLayer');

    new CfnOutput(this, 'DataAccessLayerArn', {
      value: dataAccessLayer.layer.layerVersionArn,
    });
  }
}
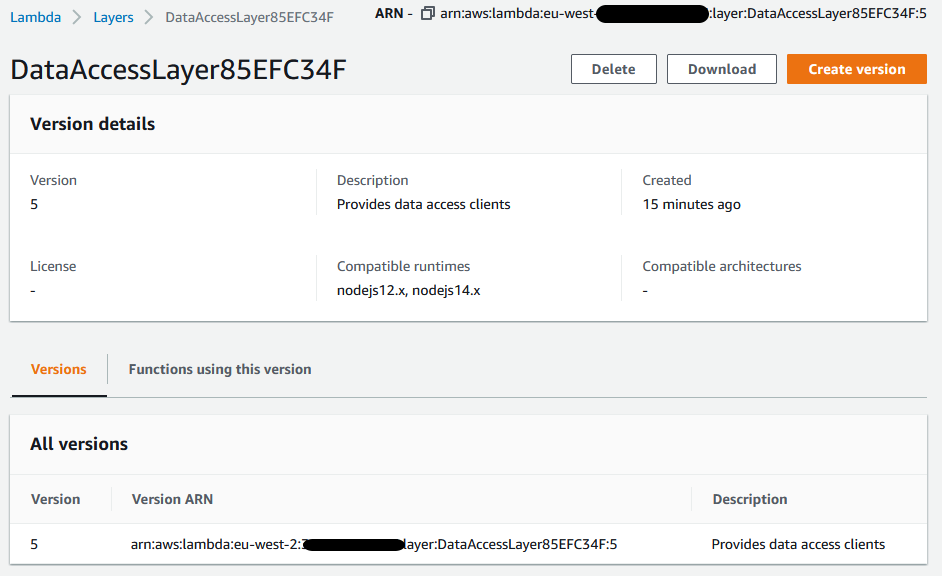
Once deployed, we can see the layer in the console.
Using the Lambda layer
Now that we have our Lambda layer, we need to work out how to use it. The first trick is how we need to reference the layer so that it will work at runtime. This involves referencing an absolute path starting with /opt/nodejs, as shown below.
import { AccountDetailStore, CustomerStore } from '/opt/nodejs/data-access';
This gives us the first major problem, which is how do we compile our TypeScript code against it. Although we have the source code for the layer, it isn't at the location that our import is pointing to.
The solution is to use the paths compiler option in tsconfig.json to point the compiler at the actual location of the layer source code.
{
  "compilerOptions": {
    /* Snip */
    "paths": {
      "/opt/nodejs/data-access": ["src/data-access/layer/nodejs/data-access"]
    }
  }
  /* Snip */
}
With this in place, we can happily build our Lambda function. However, it raises the question of how would you do this if the layer source code was not available locally. You can download the layers via the console, and possibly by the SDK, but this is not ideal. This is one of challenges that seem to make working with layers more complicated than working with npm packages.
Packaging the Lambda function
Our next challenge is how we can package up our Lambda function. The trick here is not to package up the layer code with the Lambda function code. The first example I looked at was using the NodejsFunction construct. This construct uses esbuild behind the scenes to bundle the code into a single file. This is usually very convenient, but had the result of including the layer code directly. When I updated the example layer code, the behaviour of the Lambda function using the layer didn't change. This was because it wasn't actually using the layer code.
You can specify BundlingOptions for the NodejsFunction construct, which has a externalModules property that is documented as follows:
A list of modules that should be considered as externals (already available in the runtime).
However, for our project, we can avoid this bundling issue by using the Function construct and the AssetCode class. Using these, we can point at the TypeScript output folder dist as shown below.
export interface CustomerUpdatedProps {
  dataAccessLayerArn: string;
  customerUpdatedTopic: ITopic;
  customerTableName: string;
  accountDetailTableName: string;
}

export default class CustomerUpdatedHandler extends Construct {
  constructor(scope: Construct, id: string, props: CustomerUpdatedProps) {
    super(scope, id);

    // Snip - getting tables

    const dataAccessLayer = LayerVersion.fromLayerVersionArn(
      this,
      'DataAccessLayer',
      props.dataAccessLayerArn
    );

    const customerUpdatedHandlerFunction = new Function(
      scope,
      'CustomerUpdatedHandlerFunction',
      {
        runtime: Runtime.NODEJS_14_X,
        handler: 'CustomerUpdatedHandlerFunction.handler',
        code: new AssetCode(
          path.join(
            __dirname,
            `/../../dist/src/application/customer-updated-handler-function`
          )
        ),
        environment: {
          [ENV_VAR_CUSTOMER_TABLE_NAME]: props.customerTableName,
          [ENV_VAR_ACCOUNT_DETAIL_TABLE_NAME]: props.accountDetailTableName,
        },
        layers: [dataAccessLayer],
      }
    );

    // Snip - adding subscriptions and permissions
  }
}
We use the layers property to make the layer available to the function. We obtain the reference to the layer by using the LayerVersion.fromLayerVersionArn method and the ARN of the layer, which we pass in via the construct props.
Now we have our function construct we can use it in a stack. Here we obtain the layer ARN from the SSM Parameter that we created when we deployed the layer. This approach means that every time we deploy the function it picks up the latest version of the layer.
export default class ApplicationStack extends Stack {
  constructor(scope: Construct, id: string, props?: ApplicationStackProps) {
    super(scope, id, props);

    // Snip - creating topic and getting table name parameters

    const dataAccessLayerArnSsmParameter =
      StringParameter.fromStringParameterName(
        this,
        'DataAccessLayerArnSsmParameter',
        DataAccessLayer.LAYER_ARN_SSM_PARAMETER
      );

    new CustomerUpdatedHandler(this, 'CustomerUpdatedHandler', {
      dataAccessLayerArn: dataAccessLayerArnSsmParameter.stringValue,
      customerUpdatedTopic,
      customerTableName: customerTableNameParameter.stringValue,
      accountDetailTableName: accountDetailTableNameParameter.stringValue,
    });
  }
}
I am not recommending this approach, but it was an interesting concept to play with. I had wondered if functions could reference the latest layer and then if you could update the latest layer underneath it. However, functions have to reference a specific layer version. So the approach above is as close as I could manage, where you can update a function without a code change.
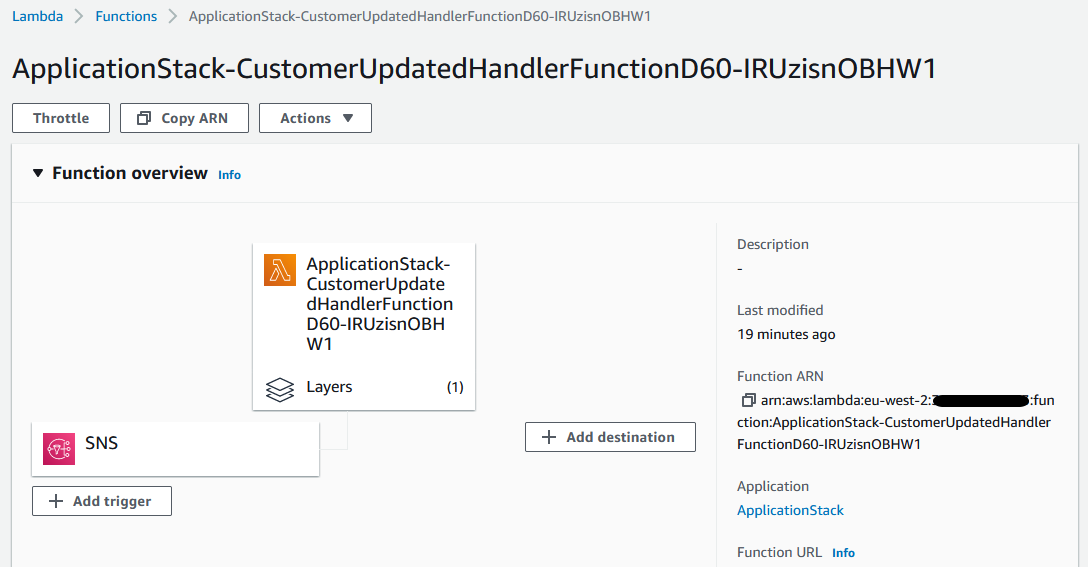
After we deploy the Lambda function, we can see in the console that we have referenced as expected.

Summary
It was interesting to have a play with Lambda layers and it was a bit of a challenge to get it all working. Given this, I suspect that I will not be reaching for them out of my toolbox any time soon.
In this post, we covered deploying and building, but we didn't cover testing. The companion repo includes some integration tests, but local testing is tricky. I prefer integration testing in AWS, so this isn't so much of a negative for me. However, it may be a deal-breaker for some.
All in all, I think I agree with the conclusions in the fine article "AWS Lambda Use Cases: When to use Lambda layers" by Yan Cui, one of which is to prefer npm as the default reuse approach.
That said, it was interesting to actually kick the tyres on layers. If you are curious, then clone the repo and have a play yourself.