


How To Build A Minimalistic Zero Cost Lambda-Powered Social Media Dashboard
Refreshing your social media sites hundreds of times per day? Build your own minimalistic dashboard on AWS that runs at $0 per month. Code included.


Since I've started to be an active content creator, checking how I'm doing at my favorite sites like Twitter, Medium or StackOverflow has become an obsession. I'm refreshing all of those hundreds of times per day.
So finally I thought: why not gather the data I'm interested in automatically and display them via a minimalist frontend?
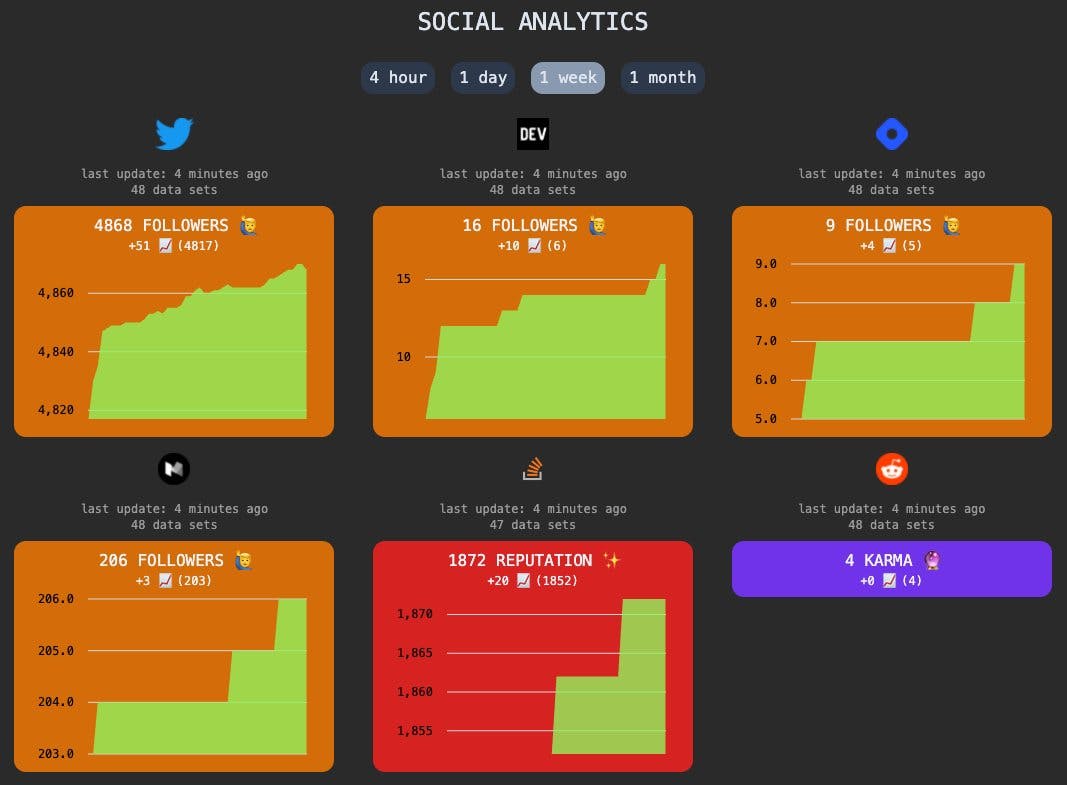
A few hours later, what you can see on the cover picture is the result. It's not very pretty, but it gets the job done.
The best part: it runs for $0 on AWS, as it's Serverless and sponsored by the free tier.
If you haven't heard about AWS Free Tier yet: it's a great opportunity to get started with AWS, as you get a lot of free contingent for different services. It covers three different types:
- 12 months free: you'll get 12 months of free contingent after your account creation
- free trials: short term free trials that start with the service activation
- always free: enjoy free offers that do not expire
What I've used:
- Languages: Node.js, JavaScript & TypeScript
- Frameworks: Terraform & Angular
- AWS Services: Lambda, DynamoDB, API Gateway, CloudWatch, CloudFront & S3

No previous knowledge is required and this is a great chance to get started with AWS and Infrastructure as Code, as Terraform will be used.
All of the code can be found at tpschmidt/social-dashboard - contributions welcome! 👋
Overview
Let's have a look at our target folder structure so that it's clear where we're heading at the end of the day.
go.sh # collection of scripts for building & deploying
configuration.json # all of our API keys & other variables
/app # our angular app
/infra # our terraform code for our infrastructure
|- social-crawler.js # calling crawlers & persisting to DynamoDB
|- social-api.js # delivering data to our frontend
|- social-aggregator.js # aggregating old data
|- /platforms # containing our data crawlers
   |- twitter.js
   |- medium.js
   |- ...
We're keeping all of our configurations and secrets inside the configuration.json file, which is ignored by git so we can't accidentally push it to Github. Later, we'll use this file with Terraform.
The go.sh file will contain useful scripts for building, packaging, and rolling out our code and infrastructure. All functions which start with a goal_ prefix will be exposed, so you can for example call goal_deploy via ./go.sh deploy.
Infrastructure with Terraform
Terraform is a great Infrastructure as Code (IaC) tool, especially when creating large eco-systems with lots of components due to its structuring and blueprinting capabilities. It enables us to create all resources we need in a deterministic way via AWS APIs, instead of having to create and configure them via the web console, which is way more error-prone and hard to debug.
A quick overview of what we need for our project:
- An S3 bucket that acts as an origin for a CloudFront distribution. By that, we can deliver our frontend application as static HTML
- Lambda functions to crawl, persist and deliver data
- a DynamoDB table where we can store our data to
- an API Gateway to expose our data for the frontend
Terraform 1x1
I'm recommending tfenv when working with Terraform, as it allows you to easily install & manage different versions of Terraform.
With Terraform, we can manage our state remotely via an S3 bucket (persisting the state as JSON files) and a DynamoDB table (enforcing locks, so Terraform can't run in parallel from different locations - just using the Hash Key LockID).
As this is the base to enable us to work with Terraform, we need to do this in the beginning by adding a small bootstrap-tf function to our ./go.sh script that creates both resources based on terraform_state_bucket and terraform_lock_table in our configuration.json file.
STATE_BUCKET=$(cat "configuration.json" | jq -r '.terraform_state_bucket')

BUCKET_EXISTS=$(aws s3api head-bucket --bucket $TERRAFORM_STATE_BUCKET)
if [[ $? == 0 ]];then
  echo "Bucket already exists & is owned by you ✅"
elif [[ $(echo $BUCKET_EXISTS | grep '404') ]];then
  echo -e "Bucket does not exist yet! Creating..."
  aws s3api create-bucket --bucket $TERRAFORM_STATE_BUCKET
  echo -e "Bucket created successfully 🎉"
else
  echo -e "${RED}ERROR${NC}> Bucket name already taken!"
fi
That's for the bucket creation. The DynamoDB part looks similar - have a look at the full script.
Let's have a look at our main.tf next, which is the entry file for all of our infrastructure:
terraform {
  required_version = "=1.0.2"
  required_providers {
    aws = {
      source  = "hashicorp/aws"
      version = "~> 3.49.0"
    }
  }

  backend "s3" {
    bucket                  = "$BACKEND_BUCKET"
    dynamodb_table          = "$BACKEND_LOCK_TABLE"
    key                     = "social-dashboard/prod.tfstate"
    region                  = "eu-central-1"
  }
}
As Terraform does not allow the use of variables in the backend configuration, we'll make use of placeholders and substitute them every time we apply Terraform via ./go.sh apply-tf.
The main file will use the blueprints we created in the infra/modules directory:
- cloudfront-angular - creating our frontend S3 bucket & CloudFront dist
- serverless-backend - creating our Lambdas, DynamoDB table and API Gateway
In the case of our cloudfront-angular module, we will add:
acm.tf- for requesting our certificate from ACMcloudfront.tf- creating our CloudFront distributions3.tf- for creating our S3 bucket to which we upload our static frontendroute53.tf- for creating a new DNS A record for our subdomain
By aligning our Terraform files to its corresponding AWS services, finding resources is very easy and intuitive.
Gathering what we need
Now that we've covered our infrastructure, we can get to the interesting part: retrieving our data from our target platforms.
Crawling Data
Retrieving followers, reputation, or karma from most platforms is very easy. Generally, there's a dedicated API.
Twitter.com
Twitter got its own Developer Portal where we can create a new application. This will result in an API Key, API Secret Key, API Access Token & API Secret Access. With those and FeedHive's Twitter API Client for Node.js, we can request our own followers:
# extracing our secrets from our configuration file
const getVariable = (name) => require('configuration.json')[name];

const apiKey = getVariable('crawler_twitter_api_key');
const apiSecret = getVariable('crawler_twitter_api_secret_key');
const accessToken = getVariable('crawler_twitter_api_access_token');
const accessTokenSecret = getVariable('crawler_twitter_api_access_secret');
const screen_name = getVariable('crawler_twitter_handle');

const { TwitterClient } = require('twitter-api-client');

const twitterClient = new TwitterClient({
    apiKey,
    apiSecret,
    accessToken,
    screenName,
});

const status = await twitterClient
    .accountsAndUsers
    .usersShow({
         screen_name,
         include_entities: false,
    })
The response will contain followers_count! 🎉
Dev.to
💡 For the purpose of keeping this article small, I won't include all code snippets as you can find everything in the repository.
Here we also need to obtain a new API key. Then we can just retrieve our followers at dev.to/api/followers/users if we send our API key within the api-key header.
Hashnode.com
Hashnode offers a GraphQL API and a corresponding playground, which also displays all of the documentation. In our case, we're interested in numFollowers for the user object, so our query will look like that:
{
    user(username: "<hashnode-handle>") {
        numFollowers
    }
}
Sending this as a JSON object ({ query: "<query-string>" }) via POST to api.hashnode.com will get us our followers count.
Medium.com
Medium also offers their own developer API, but for retrieving our follower's count, we don't even need that. We can just curl medium.com/@<medium-handle>?format=json and obtain our follower's count via the nested object SocialStats.
The full path:
payload.references.SocialStats["<your-user-id>"].usersFollowedByCount
StackOverflow.com
There's also no need for an API key to retrieve our reputation from StackOverflow. Just querying our own user at api.stackexchange.com/2.3/users/<user-id>?&site=stackoverflow will do the job.
You can retrieve your own UserID when you're logged in by clicking on your profile and extracting it from the URL. It will look like: https://stackoverflow.com/users/<user-id>/<handle>.
Reddit.com
Accessing Reddit's API can be done by obtaining a token via the password OAuth flow after we also created a new application at our preference center.
We need to send
- the ClientID and Client Secret from our new application via Basic Auth and
- username, password, and
grant_type: passwordvia Form parameters
to Reddit's Access Token endpoint at reddit.com/api/v1/access_token.
After that, we can access any API with our token if we include it with the Authorization header as a Bearer Token (Authorization: Bearer <token>).
We can find our Karma points via oauth.reddit.com/api/v1/me/karma.
Github.com
Followers at Github can be queried at api.github.com/users/<handle>/followers. No API key is needed. As we're not only retrieving the number of followers but actually the users themselves, the response can be paged!
Persisting to DynamoDB
Now we're able to get the data we want to collect. We could just request it when needed and directly return it to our soon-to-be-built frontend.
What would be even better:
- crawling our data on a regular basis and
- persisting it to DynamoDB
By that, we're not only relying on the availability of all 3rd parties when we want to have insights, but we also have the ability to gather statistics over time.
Last step: to trigger our crawler every 15 minutes, we can add an EventBridge scheduling rule, which will invoke our function.
Aggregating Data
So now we're crawling data every 15 minutes which will end up with 96 data sets per platform per day. That's great for having a detailed insight for the last 24 hours.
But we don't need this much detail for the past week or even month. For several days, it's enough to have a single data set per platform per day.
That's why we can create another Lambda function that will take care of "aggregating" data by deleting our fine-grained data sets which are too old already.
Building a Frontend with Angular
The frontend is built with Angular and has only three major components:
app # base component, iterating over all platforms
|- platform # platforms, iterating over each data type
   |- info-tile # displaying actual data & graph
After our data is retrieved via our own API at app.component.ts, we'll loop over the data to create our platform components. As we probably want to display other statistics in the future, a platform can contain multiple info-tiles. Currently, we're only displaying followers.
For displaying our past statistics nicely, ngx-charts is used at the info-tiles.
Final thoughts
As mentioned before, all code can be found at Github: tpschmidt/social-dashboard
This project was done quickly and there's a lot of love needed. I'm very happy to see any contributions for extensions or improvements! 👋 🎉 As an example, I still didn't figure out how to retrieve followers for LinkedIn. ⚡️
Thank you for reading & drop me a follow on Twitter if you liked it! 🎉